Friday, October 26, 2012

Moonlight Scrapbook Layout #4

I couldn't wait to use the new tulle ribbon from Close to my Heart! My 4th Moonlight 2 page scrapbook layout was the perfect place!


I used the black Tulle Ribbon along the bottom band of both pages. You can see it more clearly in the next photo.


Using the Tulle over a contrasting color created a great Halloween texture!


Chipboard pumpkins anchor a zip strip title. "Pumpkin Parade"


More Chipboard elements as journaling accents! Embellished with different sizes black adhesive backed gems.


Haunted Assortment large gems on penant shapes cut from the Art Philosophy Cricut Cartridge.

Hope you like it!

HeatherJane

Moonlight Scrapbook Layout #3

This is my third scrapbook layout created using the "Moonlight" kit from Close to my Heart. What I love about the Moonlight kit is that it can be used for more then just Halloween- which it is also perfect for!


I thought these papers were perfect to showcase my "Messy Eater"!


I created the Messy Eater title with my Art Philosophy Cartridge and cut this shape in half from what it was originally. (Making two pieces that look just like this one!) I used my Archival Black ink, Haunted Assortment embellishments, and the Cocktail Alphabet Stamp Set.

What do you think?

HeatherJane

Thursday, October 25, 2012

Moonlight Scrapbook Layout #2

My second Moonlight Scrapbook Layout that I created with my kit from Close to my Heart is based on the design that comes in the brochure with the kit. I just simplified a few things to make it easier to teach at our workshop.


This layout was ideal for photos from my daughter's 5th Birthday Party! We had a Halloween Party! I was so excited that the Moonlight Kit has PURPLE in it! I could not wait to get to this layout to use the purple. (Have you figured out yet what my favorite color is?)


To create the lamp post we stamped it in Archival black on our purple. Then while it still had black ink on it I stamped it on the sponged patterned paper over an area that was orange and cut out just the windows to the lantern. I lined that piece up with where the lamp would look "lit". Then I cleaned the stamps and stamped it again in goldrush ink again on the sponged pattern paper. Then I trimmed it out and placed it on the sign area of the main lamp post. Add some black gems and wha-la! :)


The coordinating chipboard compliments made this accent quick and easy!


Those who know me personally know I hold a special place in my heart for a real FEAR of spiders! But this guy is so cute I actually love him! :) The sparkly eyes make his irresistible on this layout!

Hope you like this layout and are having fun preparing for Halloween!

HeatherJane

Sunday, October 21, 2012

Custom 60th Birthday, Mojo Monday 263

I had a friend at work commission me to create a special one of a kind handmade card for her to give to her sister on a milestone birthday. (I LOVE this kind of assignment!)


I was given the inspirational ques of: "her name is Beth", "she is turning 60!", "I just LOVE her, she has always been there for me!" How do you like my interpretation of this?


I created the layout of the card based on the above sketch from Mojo Monday Blogspot, Sketch Challenge #263. The circle was the perfect space to create a "60" Medallion! The top portion was equally as perfect of a space top place the Birthday Girl's name! Because this card has Birthday numbers on it I also entered it in the Contest on the Close to my Heart, Heart 2 Heart challenge "Birthdays by the Numbers".


For the inside of the card I typed out and printed a quote that the card giver chose. I added a small paper punched heart and layered it in 2 different colors of purple cardstock.

Supplies
  • Mojo Monday Sketch #263
  • Smokey Plum and Gypsy cardstock from CTMH
  • Heart punch
  • Keepsake Alphabet stamp set from CTMH (name and sentiment)
  • Scallop Punch from SUP
  • Circle Punch from CTMH
  • Moonlight Paper Pack from CTMH
Hope you like this Birthday Card!

HeatherJane

Happy Birthday, Freshly Made Sketches #57


Happy Birthday Card made with a Freshly Made Sketch!


This sketch was a lot of fun! Since they said I could use any shape I used a rectangle for my sentiment. Instead of ribbon and a bow I used a strip of paper and cut out a shape from one of my patterned papers. I made it more dimensional by using 3D foam tape.

Supplies
  • Freshly Made Sketch Challenge
  • "You and Me" Paper pack from CTMH (retired)
  • "Victory" Paper pack form CTMH (current)
  • "Look Who's" Stamp set from CTMH
  • Colonial White Card and Envelope
  • 3D Foam Tape

Sunday, October 14, 2012

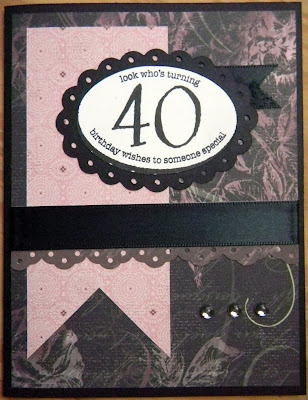
40th Birthday Card, DS73

The sketch at "The Deconstructed Sketch" was just what I needed to inspire me for a 40th Birthday Card!


I was able to use my stamp set, "Look Who's" from Close to my Heart, for the circle part of the sketch. The scalloped oval coordinates with a shape on my Art Philosophy Cricut Cartridge and made what looks like more effort then it is, very easy!


I used the paper pack from Close to my Heart called "La Belle Vie". The rich dark colors coordinate well with the "over the hill" vibe. I loved that there are little peaks of pink that keep it feminine and for a Lady!


The stamp set I used allows me to personalize the birthday age, which I love!


Supplies
  • La belle vie Paper Pack- CTMH
  • Stamp set: Look Who's D1502- CTMH
  • Art Philosophy Cartridge- CTMH
  • Scallop Punch- SUP
  • Epoxy Bubbles- CTMH
  • Black Satin Ribbon
  • Archival Black Ink- CTMH
Hope you enjoyed stopping by my blog!

HeatherJane

Peace on Earth Christmas Card, Freshly Made Sketch #56

I am in Christmas Card mode and the sketches at "Freshly Made Sketches" keep me inspired.

This was another sketch that was great for my "Glory to God" stamp set from Close to my Heart!


Techniques: "Rock-N-Roll". The border of the city as perfect for the horizontal strip in this sketch. I used the rock-n-roll technique to ink it up before I stamped. I used three inks and started with the lightest first. I inked the entire image in Bamboo, then half of it in Chocolate, then 1/4 of it in Cocoa. I love how it came out! I entered this card in the Rock-n-roll challenge on the Close to my Heart Heart 2 Heart Challenge blog!


Swiping: For Mary, Joseph, and Baby Jesus I inked them up in Chocolate and used the swiping technique to give them a special stand out effect. I think it almost looks like wood-grain in a way.

Supplies:
  • Stamp Set: Glory to God, D 1483
  • Scholastic Paper Pack
  • Ink: Bamboo, Chocolate, Cocoa
  • Card stock: Colonial White base, Bamboo, and Chocolate
  • Opaques, Mocha, Z1333 CTMH
Hope you like it!

HeatherJane

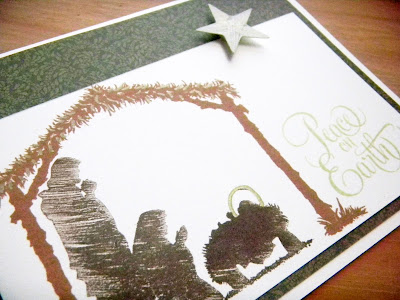
Manger Scene, Merry Monday #36

I am LOVING playing along with the card sketch challenges at "Awlays Playing with Paper"! The Merry Monday challenge is forcing me to prepare my Christmas Cards now, it is just the fire that I need lite! :)


I flipped my sketch on its side to create my card with a Manger Scene.


I am having a lot of fun with this stamp set, "Glory to God", from Close to my Heart.


Swiping is one of my new favorite techniques! The stamp from this set that shows Mary, Joseph, and Baby Jesus is perfect for this technique because it is a solid silhouette. I ink it up like I would normally, but in my last ink tap I slide it instead of pounce it. If you haven't tried this yet I know you will love it when you do!


I cut this one inch star on my Cricut with the Art Philosophy Cartridge. I used the Gold Metallic Marker from the duo marker set and colored it in before putting it on my card with 3D Foam Tape. I also used the marker to accent the hay and the Halo on the Manger Scene.

Hope you like it!

HeatherJane

Friday, October 12, 2012

Moonlight Scrapbook Layout #1


My first layout with moonlight is for my daughter's ultrasound photos! I know what you are thinking... " isn't this the Halloween kit?" Well, it works perfectly for Autumn themes too. My daughter was born in the fall. But, what makes it even more special for us is that we truly believe we have an owl for a stork! Just before we confirm we are pregnant we have a significant run in with a rarely seen owl.


Supplies:
  • Moonlight workshop on the go kit
  • Make it from your Heart sketch book Volume 1
  • Keepsake alphabet stamp set
  • Lucy stamp set
  • Smokey plum ink pad
  • Haunted assortment gems
  • Sparkles assortment (grey)

Wednesday, October 3, 2012

Organize Your Craft Supplies!


This video from Close to my Heart shows you how to use the NEW storage items found on page 119 of the Autumn/Winter 2012 Idea book.

My personal favorite (its hard for me to pick a favorite I wish I could be like my 5 year old and just answer "All are my favorites!") is the small organizer with the foam insert that holds the My Acrylic blocks! I have been storing my blocks in a bag until now and am finding they are getting a bit scuffed up and scratched from that. I know this organizer is a must have to keep our blocks in tip top shape and lasting forever new.

I also love how the small organizer nests on top of the medium organizer. Keeps the bins from sliding when you carry them or drive them across town to crops!

What other uses can you imagine for the organizers, craft storage boxes, and foam inserts?

HeatherJane